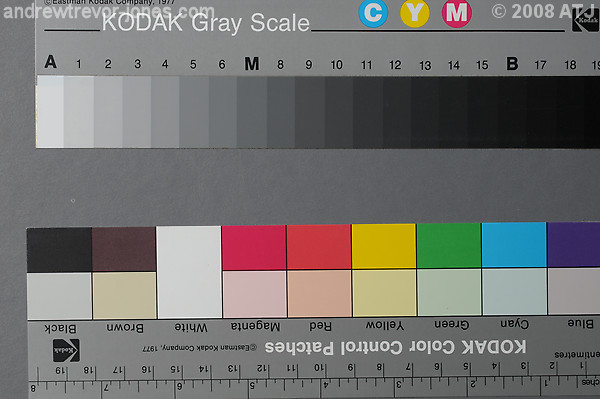
A JPEG image as it appears in Lightroom. This is how the image should look.
Friday 11 April 2008
In mid-February a friend provided a demonstration of Adobe Photoshop Lightroom. I was quite impressed and thought I would evaluate the product to replace my current workflow. It has been an interesting experience and I have to say it is not an easy tool to pick up.
Before discussing my path to learning Lightroom, it is useful for me to explain the previous workflow I used to produce images for the web. For the majority of the time I was using my Nikon D70, my workflow was quite simple. I coped images from the CompactFlash card to the hard disk using an USB card reader and the Transfer facility in Nikon View 6. I reviewed the images using Nikon View 6 and opened the raw images directly into Paint Shop Pro 9. PSP9 has its own raw processor which did an adequate job of converting images and gave me some control over the conversion of the image - mainly white balance and exposure. This was adequate as my aim has always been to get the images pretty much the way I want them in the camera.
Once the D300 was announced, and I decided I would buy one, I realised that the raw processor in PSP9 would not work and that as PSP9 had been superseded by a number of versions I would not be able to use it to process the D300 images. As it is likely I would stay with Nikon for some time, I thought their native raw processing software, CaptureNX would be the best choice. I had to buy a licence which I got from ImageMixer.net. I also needed Nikon ViewNX for browsing and this is a free download.
My work flow did not change all that much. I used Nikon Transfer (free download) to copy the files from the CompactFlash card to the hard disk and back them up in one go. ViewNX to review the files. I would open the raw files in CaptureNX and make any changes if required. From CaptureNX I could open the files with PSP9: CaptureNX saves the files as a TIFF and opens the TIFF in PSP9. I used PSP9 for cropping, resizing, sharpening, adding EXIF information and watermarks. This process worked very well and as I usually got the images correct in the camera, I often had to do very little other than resizing, sharpening and adding the EXIF and watermarks. One of the great things about CaptureNX is it uses the camera settings as the defaults for the raw processing. This means the images look the way I want straight out of the camera.
If the workflow was working so well, why change? Transfer/ViewNX/CaptureNX/PSP9 had some drawbacks. Probably the biggest was that both ViewNX and CaptureNX use a lot of memory - and I mean a lot. ViewNX can take 200MB of memory just displaying the files in a directory. I have seen it use a lot more, although I'm still not sure why. CaptureNX can use up to 500MB of memory just opening a single raw file. Once changes are made, this can grow to over 700MB once a few changes are made. This huge use of memory can really slow a workstation down, even if it has 2GB of memory installed.
My previous workflow also wasn't good for cataloguing my images, whether it was by subject matter or location. All I really had was the month and year the photographs were taken. The keywording in Lightroom would mean that I could relatively easily tag the photographs at the time of import as well as adding further keywords as I reviewed the images. Some of the automation in Lightroom was pretty good, too, as I had multiple local directories in which I would store images before uploading to the web.
In mid February, I started my journey with Lightroom by downloading the free trial of Lightroom 1.3.1 from Adobe.
After seeing the demonstration of Lightroom I was quite impressed with its abilities and the streamlined workflow. The first thing I did after installing the free trial was to import some of my D300 raw images. On import I had the choice of various presets including "Default Settings" and "General - Zeroed". I started with "Default Settings" and imported a batch of my image. While some images looked pretty good, most had way too much contrast and looked anything but natural (I am a nature photographer after all). I selected them all and tried "General - Zeroed". This gave me the exact opposite with all the images looking very flat. It is an understatement to say I was disappointed.
A JPEG image as it appears in Lightroom. This is how the image should look.
The NEF version of the same image as it appears in Lightroom when using "General - Zeroed", compared to the JPEG. Use the toggle button to swap between both images. The image looks quite flat.
The NEF version of the same image as it appears in Lightroom when using "Default Settings", compared to the JPEG. Use the toggle button to swap between both images. The image has too much contrast
I asked around on a number of forums and it appears that many people felt the same way: that Lightroom does a poor job on raw conversion. A Google search also finds people who are unhappy, for example: Lightroom-Blog.Com: Why do my photos go dull when I import them into Lightroom?. Interestingly, there were a number of people that didn't have a problem but it appears they were all previous Adobe Camera Raw (ACR) users. (Lightroom uses the same ACR that is used in Photoshop.) The most common advice I could find was to create develop presets to adjust the images to make them look the way you want. I tried this and while I could get some improvement, I could not get some of my images to look the same way as they do with CaptureNX.
The NEF version of the same image as it appears in Lightroom after I adjusted various settings compare to the JPEG file. Use the toggle button to swap between both images. It is close to the JPEG, but cyan is not quite right.
Note that page should be viewed with a browser that supports colour management, like Safari, and on a calibrated monitor to see the colours accurately.
I changed the D300 settings so that it would store images as both raw and JPEG fine. When imported into Lightroom using "General - Zeroed", the JPEG images looked the same as they do in CaptureNX. At least this way I could get an idea of how the images should look. I found that with my next batch of images, I could modify the NEF files and get them looking very close to the JPEG file. This gave me some comfort, however, I did have some images that while I could get the exposure, dynamic range and most of the colours very similar, some colours were very different. No matter how I tried I was not able to get all the colours correct.
After further discussions with other users I realised that my only option with difficult images was to convert them from raw to TIFF using CaptureNX and I could then complete the workflow in Lightroom. This was a lot more difficult than it sounds, but I managed to come up with an approach that was fairly straight forward and I documented that in another blog entry: Lightroom: Externally editing a raw file. With that disappointment somewhat behind me, I was able to concentrate on other aspects of Lightroom.
I figured the best way to learn how to use Lightroom was to use it, so from 18 February, I ran all my images through Lightroom. The basic workflow with Lightroom is as follows:
Lightroom allows you to import images directly from the CompactFlash (or other device) into its catalogue. At the same time it copies the images to a specified location. Lightroom detects a card with images on it and automatically prompts for an import. It also has the capability to backup up the images to a second location on import. This is exactly what I do with Nikon Transfer and so I had the opportunity to remove one step from my process. Unfortunately, it appears that the developer who implemented the backup function didn't think about what users may want and has the backup process create an extra directory as documented below.
I will continue to use Nikon Transfer for transferring images.
Images must be imported into Lightroom before you can work on them. The files themselves aren't imported and they stay untouched in their original location or they can be copied or moved to another location. Lightroom creates links to the files and also previews of the images so you can work with them.
At the time of import, some information can be applied to all the images being imported. The information that can be applied on import are:
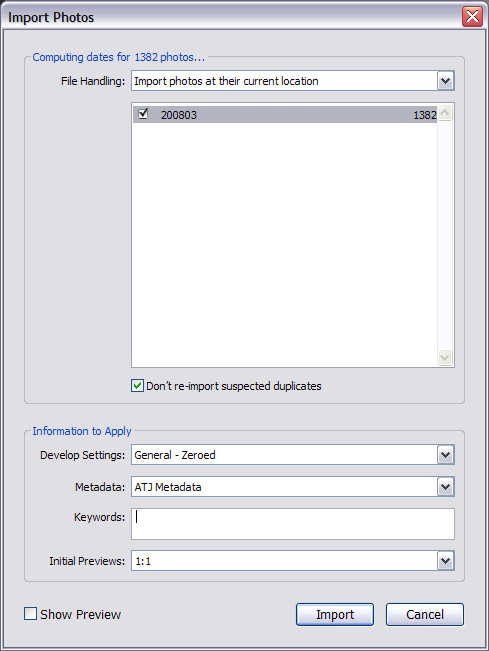
Import Photos dialog
The last item determines the size of the previews created initially when the files are imported. As mentioned above, the previews are what you actually view in Lightroom. You have a choice of minimal, standard and 1:1. I can't find anything in the documentation that indicates what the minimal and standard choices give you. I believe if you choose standard, Lightroom uses the settings from the File Handling page of the Catalog Settings. Minimal probably gives you thumbnail previews. The 1:1 setting will give you a full size preview. If you view an image it Lightroom at 100%, it will need a 1:1 preview. If you created it on import, it will be available immediately. If you didn't (chose minimal or standard), Lightroom creates the preview at the time you view the image at 100%. Note that the more 1:1 previews you have in the catalogue, the more disc space Lightroom will take.
When I import I choose "General - Zeroed" for the Develop settings to the JPEG images will display correctly. I have created a basic metadata preset that just adds my name and copyright information to the metadata but I am considering creating location based presets as discussed below. I add any keywords appropriate to the shoot. I have been adding location information, but may switch to using the specific metadata fields for that. I choose 1:1 for all my imports and I have the Preview Cache set to discard the 1:1 previews after 30 days.
I store my images on disk by camera by month. All images taken on my D300 in March 2008 go into a directory called "200803" within "NikonD300". Each time I import, I select the directory to which the last batch of images was transferred. Lightroom is smart enough to determine which images are already in the catalogue from that directory and only import the new ones. Most of the time it does this very quickly but I had a bit of a scare after eastern Australia went off daylight saving when it looked like Lightroom would import all the existing images again. I assume it is related to the fact that Windows displays the time on files on NTFS out by one hour if they were created with a DST setting different to the current one. For example, a photograph taken at 11:00am in March (when DST was in force) displays as 10:00am when viewed in April (when DST is not in force) - this is similar to what Lightroom does (as described below). Fortunately, Lightroom worked out that there were already present. This was because I had "Don't re-import suspected duplicates" selected on the Import Photos dialog.
After importing, all the images imported in the last operation are displayed and work can begin on organising them.
Lightroom has a Library module in which you can view, organise and manage images in the catalogue. The images can be viewed in grid view, which shows them as thumbnails or in loupe view which displays one image at a time. Additionally, there is compare view, which lets you view 2 images to be compared and survey view which allows you to compare one image to multiple other images. Organising the images includes adding metadata to assist with identifying, finding and grouping images. Additionally, images can be tagged with colours, star ratings and flags.
As I was now shooting NEF (RAW) + JPEG fine, I would get 2 images per shot. The first time I imported the images, all my JPEG images "disappeared". I discovered this is because the setting "Treat JPEG files next to raw files as separate photos" is unchecked by default. As I wanted to work with the JPEG images initially, this was next to useless. I turned the setting on, removed the imported images from the catalogue and imported them again. This time both the JPEG and NEF files were visible.
I did like the idea of being able to hide the images and for a while thought of using the metadata browser which lets you display just the JPEG images (or the raw) however, that would be too clumsy. I then stumbled on "stacking". This is a feature in Lightroom that allows you to put similar images in a stack. What I wanted to do was to put identical images in a stack. I then discovered "Auto-stack by Capture Time". This let me chose the time interval on which the stacks would be based. If I chose one second, it would create a stack for each individual image (unless I took more than one image per second, which would be rare for me). I could then collapse all the stacks and just see the JPEG images which displayed the way I wanted them. (Note that on one occasion, for some unknown reason, I imported images and the NEFs got stacked on top.)
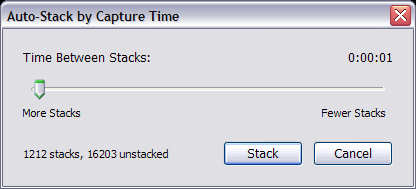
Auto-stack by Capture Time dialog
Stacking my images meant that it was easy for me to review the JPEGs from a shoot and decide which ones I wanted to use. Once I chose the JPEG image, I could unstack it (with the 's' key) and then work on the NEF file if I wished.
Stacking has some limitations. Stacking only works with some selections such as "All Photographs" or "Previous Import". It does work if you use Keyword Tags or the Metadata Browser to restrict the images to be displayed. I don't know why this limitation exists but it does seem a little silly.
If the stacks are collapsed, keyword and metadata changes are only applied to the top image in the stack. This means you need to expand any stacks if you want to apply some keywords or other metadata to the images that are part of a stack.
Lightroom supports International Press Telecommunications Council (IPTC) metadata attributes in images. This allows attributes such as location, copyright and keywords to be stored with the image. It also supports the Exchangeable image file format (Exif) which is used by the camera to store technical data about the image such as shutter speed, aperture and focal length.
While metadata is one of the strengths of Lightroom, I initially found it daunting because there is just much that can be applied to an image. It probably took me a month to get a handle on what I wanted to set and the most efficient way to use the metadata. Even after using Lightroom for 6 weeks I'm rethinking some of the ways of storing information.
For example, I was initially putting location information in keywords. First as separate fields and then as a keyword hierarchy (Country->State->City->Location). I ended up making a lot of mistakes. I now think it is better to make use of the IPTC fields for this information and will probably set up some metadata presets covering any frequent locations, such as dive sites.
I find the keywords to be useful for identification information of the organisms I photograph. For example, I will tag a number of photographs of a Peron's tree frog with both the common and scientific names and may also include family and other taxonomic information.
The ability to set metadata presets is quite handy. I initially only had a few fields set (Creator and Copyright) but now I also include copyright URL and website URL and will also be including location information as mentioned above. Using the presets, I can have all these fields set automatically when the images are imported.
Under my previous work flow, I was using PaintShopPro to set Exif information and was using Image Description to store the subject and original file name. This is the caption field in Lightroom. I also set the Title field (to be used for automating dive log photographs) and Copy name (which I use on export to set the filename of the exported image).
Keywords and most other metadata can be used to restrict what images are shown in the Library module.
The Library module does allow for some adjustments of the image, especially with develop presets, however, the Develop module allows for a lot more manipulation of the image. There are a large number of attributes of the image that can be adjusted and I have not yet explored them all. Basic brightness and contrast are there as well as exposure. There are a couple of new ones to me: Recovery and Fill Light. Recovery appears to be for recovering blown highlights and Fill Light appears to have the same function as D-Lighting in CaptureNX which lightens shadows. There is also Blacks for enhancing the blacks in the images.
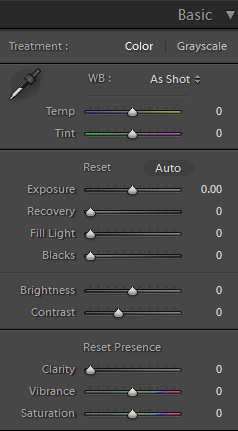
Basic section of the image adjustment panel in the Develop module
In addition to the Basic section, there is Tone Curve, HSL (Hue, Saturation, Luminance), Split Toning, Detail (including noise reduction and sharpening), Lens Corrections and Camera Calibration. This gives quite a lot of scope for adjusting images, probably more power than required.
As already discussed, by default the raw images do not look the same as the JPEG images. I have found the easiest method to adjust the raw files is to use the Auto tone button and then dial back the brightness and contrast (as Auto tends to overdo both). This allows me to get pretty close to the JPEG file or an improvement on it. There are exceptions to this and for these I use CaptureNX to create a TIFF.
The Develop module also includes the ability to crop images, red-eye removal and spot removal (limited cloning). Cropping is fairly easy to do and you can set the aspect ratio to be used including adding your own custom ratios. Using the preset and custom ratios does not always work as desired. For example, if the original image is 3 x 2 (width by height), I can't find a way to crop it to 3 x 4, i.e. higher than it is wide but in a different aspect ratio.
I have not used the red-eye removal as yet.
The clone tool (called "Remove spots") is counter intuitive to me. I'm used to first choosing where the are from where the clone will be taken and then the area to be corrected. With Lightroom you select the area to be cloned and then choose the source of the clone. You are restricted to a circular area and can only change the size. It seems to work for most blemishes to be corrected but I did find some that I could not correct adequately.
Export is the process in Lightroom to produce images for use outside Lightroom. In most cases the exported files will be JPEGs for displaying on the Web, but it can also export other formats including TIFF and DNG. The export capabilities are fairly basic and you can set the following:
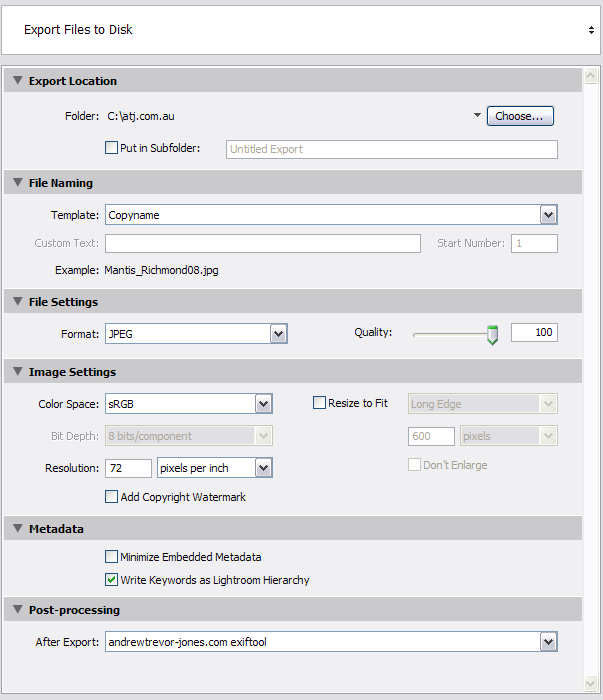
Basic Lightroom Export dialog
While the export is quite good, it does leave out some important functions such as the ability to sharpen images and add watermarks (other than a basic copyright one). Fortunately, Lightroom allows for plugins and a there is a very good one written by Timothy Armes called LR/Mogrify. This allows access to most of the functions of ImageMagick's Mogrify tool. This adds a number of features to export including:
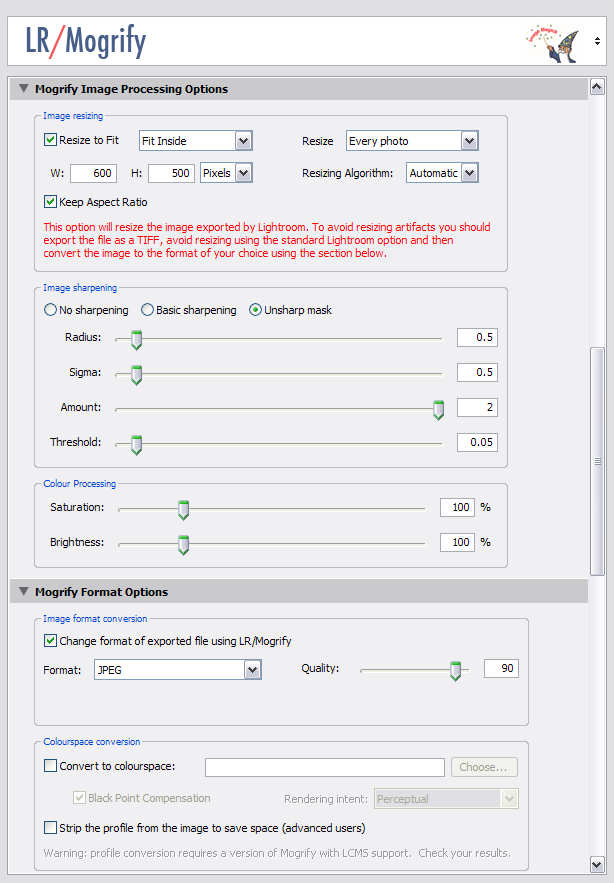
LR/Mogrify Export dialog showing some of the extra options
With LR/Mogrify I am able to export my images with watermarks the way I want them, but also have different presets for different target locations. For example, for images for this site, I do the following:
Images in landscape orientation with aspect ratios of 3 x 2 up to 6 x 5 will be created as 600 pixels wide. Images in portrait orientation will be no more than 500 pixels high. Square crops would be 500x500 pixels. This fits in with the layout for this site. The first watermark is created from a PNG graphic which has a transparent background and the text is 50% transparent. The second watermark is text based and it pulls the text from the "copyright" metadata field.
The preset I use for my diving images published in my dive logs is the same except that the width for all is 600 pixels regardless of the orientation or aspect ratio.
I use the metadata field "copyname" to determine the filename of the exported image. For many years my convention for the filenames is subject_locationnn where nn is the 2 digit year the photograph was taken. For example, for the first image of a Peron's tree frog (Litoria peronii) taken at Glenbrook in 2008 would have the filename L_peronii_Glenbrook08.jpg. For each subsequent image I append -n where n is the sequence number. For example, the second image of a Peron's tree from Glenbrook in 2008 would be L_peronii_Glenbrook08-2.jpg. Fortunately, Lightroom supports this convention. I just set the copyname of all 2008 Glenbrook L. peronii images to be exported to L_peronii_Glenbrook08 and Lightroom checks if the filename exists and if it does, asks me if I want to Use Unique Names. If I click the button, it appends the sequence number to the filename to make it unique. This works very well when I export one image at a time but a bug in Lightroom means it won't work properly for batches (see below).
One problem I did have with export was that some of my images looked a bit flat when viewed with the browser (Firefox 2.0). Most images were fine but some lacked depth and seemed lighter than they did when viewed in Lightroom. I had not had this problem with my previous work flow so I ran one of the problem images through CaptureNX and PaintShopPro 9. The image from PSP9 looked exactly the same in PSP9 and Firefox so it looked like Lightroom may have been doing something wrong. I checked my export settings and they were correct. I was embedding sRGB colour space. The exported file also looked fine if I imported it back into Lightroom.
I was then enlightened about the fact that Firefox 2.0 (and Internet Explorer) do not do any colour management. That is, they ignore the embedded colour space information and use defaults for displaying colours. Jeffrey Friedl�s Blog provides good detail on Digital-Image Color Spaces and it is well worth a read. Apple's Safari browser does do colour management so I downloaded and installed it and sure enough, the image looked "correct:" with Safari. So that explained why some images exported from Lightroom looked "wrong", but why were the images looking "right" when saved from PSP9?
With a little help and after a bit more digging into the settings I had for Colour Management in PSP9, I realised I had it configured incorrectly. First, I was not embedding a colour space at all. Second, the image was being created using the colour monitor for my profile. This explains why the images looked identical in Firefox compared to PSP9. I now have PSP9 configured correctly. It does mean that my images may not look as good on my monitor, but at least now they are standard and if people are using Safari (or another colour managed browser) and their monitors are calibrated (as mine is), they will see my images as I intend them to be.
Up until now, I had really only worked with images from the D300 which had been taken between December 2007 and March 2008. Once I had decided that I was going to use Lightroom for all my workflow, I imported all my D70 images, some 14,000 images between March 2005 and February 2008. While working on some images taken on a dive in April 2007 I noticed that times of the images displayed in Lightroom were ahead by an hour. i.e. a photograph that had been shot at 10:16am was showing in Lightroom as if it had been taken at 11:16am. I reviewed a large number of my D70 images and found that images taken October through March had the correct time where as images taken from April through September were being displayed an hour ahead. This suggested some kind of daylight saving adjustment, but to me it seemed around the wrong way as in eastern Australia we observe daylight saving from the first Sunday in October to the first Sunday in April. Note that prior to 2008, eastern Australia was on DST from the last Sunday in October to the last Sunday in March which means even if there was some valid reason for Lightroom to adjust the times, it was doing it all wrong.

Photograph as displayed by Lightroom showing the wrong time
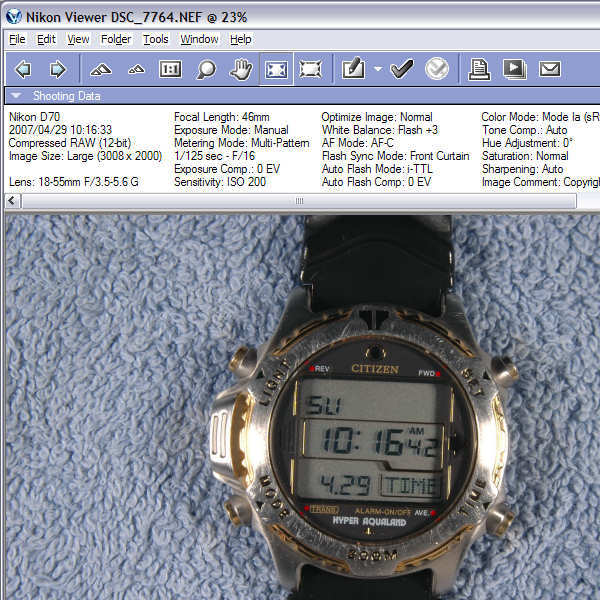
The same photograph in NikonView showing the correct time
After checking the Lightroom Forums I found that it had been raised before: Problems with date/time, although not really discussed in detail. I kicked the discussion along a bit and finally got response from Adobe suggesting that they are working on it. I also submitted a bug report.
I should add that once Windows (XP) adjusted my clock back to normal time from DST, the times on all the photographs taken October through March were pushed back an hour and the April through September photographs display correctly.
Lightroom offers the ability to import directly from a device like a CompactFlash card and copy the files to disk. It also offers the ability to back those files up to another location as part of the import. Both of these are convenient features and would replace the functions of Nikon Transfer which copies the files to a primary and backup location - if it wasn't for a very strange decision by the developers. While it is possible to specify the backup location for the files, for some reason the developers thought it would be good to create a subdirectory for each transfer called "Imported on day, date month year". This is such a Microsoft thing to do. Why not let me decide what paths I want rather than forcing something on me? I have submitted a feature request to Adobe to fix this.
As discussed above, I use "copyname" to set the export filenames and I rely on Lightroom to determine if the filename already exists and append a sequence number when it does. While this works perfectly well when I export one image at a time, Lightroom can mess up badly if I export a batch of images.
Here is a specific case that happened. I already had an image called P_versipora_Camp08.jpg in the export directory. I exported a batch of 3 photographs each with a copy name of P_versipora_Camp08. When I select Export, Lightroom tells me there is a duplicate and asks what I want to do. I choose Use Unique Names. Lightroom exports the first image as P_versipora_Camp08-2.jpg. It then exports the second image as P_versipora_Camp08-2.jpg, overwriting the first image. It then exports the third image as P_versipora_Camp08-3.jpg. This is not correct. It should have given me P_versipora_Camp08-2.jpg, P_versipora_Camp08-3.jpg and P_versipora_Camp08-4.jpg. If I export each one separately, I get 2, 3 and 4, correctly.
It gets worse. If I export the same 3 images again, I get the duplicate message and choose Use Unique Names. Lightroom then exports the three images as P_versipora_Camp08-4.jpg, P_versipora_Camp08-2-2.jpg and P_versipora_Camp08-3-2.jpg. It appears that when doing a batch Lightroom first decides the filenames, then determines what files are already there and does not take into account the effects of the previous steps in the batch. I have submitted a bug report on this to Adobe.
In both the Library and Develop modules the screen is divided into 5 panels. There is a the central image area surrounded by one area on each of the four sides. Above the central area is the identity plate and module picker. Below is the filmstrip showing all the images in the current filtered view. The areas on the left and right serve different functions in the Library and Develop modules. Lightroom allows for each of these areas to be collapsed so that more screen area can be dedicated to the image or grid in the centre.
Lightroom screen with all panels collapsed and expanded. Use the Toggle button to switch.
When an area is collapsed, it can be recalled permanently by clicking on the small arrow or temporarily by moving the mouse over the margin of the screen. Unfortunately, the temporary recall is too sensitive and I find they are frequently recalled when attempting to do something else which is extremely annoying. This happens most often when attempting to scroll the central view as slight miss with the mouse brings up the panel on the right.
Lightroom provides the capability to filter by date, i.e. only show those images shot within a date range. The interface for selecting the dates is quite clunky and at times downright frustrating.
For example, I wanted to just show all the images taken on a night dive on 30 May 2007. The dive was between 7:12 and 8:09pm. By default, Lightroom shows the full date range for all images in the catalogue.
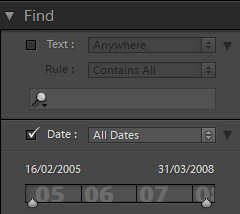
The default date range for my catalogue
When you click one of the dates in the range, a dialog pops up so you can modify the date range. This defaults current range which is all images in the catalogue.
The default date range in the Enter Date Range dialog
My first problem is I cannot enter '30' in the day part of the date because the month is currently set to '02' and February doesn't have 30 days. This means I have to set the month part of the date first. Note that if I wanted to set the date to '29/02/2008', I'd also have to set the year and month before setting the day.
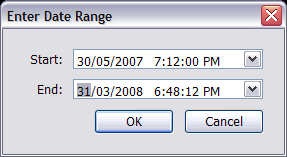
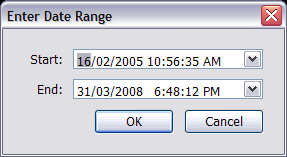
Enter Date Range dialog after setting the start date for the range
Next, I enter the end date for the range.
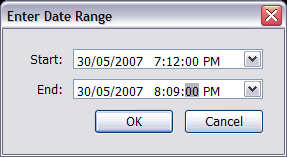
Enter Date Range dialog after setting the start date for the range
After I click OK, I discover that Lightroom changed my start time from what was on the Enter Date Range dialog.
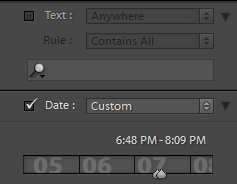
Date filter after entering a new start and end date/times
It appears that because at some point while I was entering the end date/time, the end time was before the start time, Lightroom changes my start time even though that is not reflected in the dialog. The only way to avoid this would be to set the end time before changing the end date. Of course, there are all sorts of combinations which would have similar effects. For example, if I next wanted to filter a dive on the following morning.
Lightroom should allow me to enter the dates and only do validation of the date when I leave the field and only do validation of the range when I click the OK button.
Lightroom provides scope for automation both in the tool and externally. The presets are good way to automate some tasks. You can set presets for metadata so that all the fields in the preset will be applied to the imported or selected images. Develop presets can be used to automate the development settings such as brightness, contrast, curves, etc. Export presets allow you to get consistent and repeatable results on export.
Another area for automation are export actions. These are actions that can be performed after the export has completed. I'm currently using export actions which use ExifTool to save some Exif information to a separate file which is used by the Lotus Script code for building my web pages. This means less work for me to build web pages for both andrewtrevor-jones.com as well as my dive logs on my other site. In both cases I make use of metadata to set up data in my Lotus Notes databases.
Adobe Photoshop Lightroom has the potential to be a really great tool. If you are prepared to overlook the problems described above, or don't encounter them often in your normal work flow, Lightroom could be used for the complete process from memory card to finished image. The organisational capabilities built into Lightroom are excellent. It provides numerous means of tagging and cataloguing images as well as different ways to filter or find images within the catalogue. These features alone make Lightroom an extremely useful tool.
The batch and automation capabilities, especially in the export area are also extremely useful and help to greatly streamline work flow, especially for like images. Plugins like LR/Mogrify further enhance the capabilities in this area.
The problems, however, do tarnish the product. Many of them seem to be a lack of consideration for what end users may want and limit some areas of the tool to what the developers wanted. I am hopeful that over time, Adobe will listen to users, and even seek input from them, to improve the product. Most importantly, any feature should be flexible as users may choose to work in different ways.
For me, the biggest problem is the poor handling of the raw files by default coupled with the difficulty I have in getting some of my images to look the same as they would if I was using CaptureNX. I have no doubt that CaptureNX does a significantly better job of handling the raw files. Fortunately, I have been able to configure Lightroom to allow me to use CaptureNX to convert the more difficult images. I am hopeful that this area of the tool will big enhanced one day, or at least sets of presets might become available that more closely simulate the results from CaptureNX.
Despite all the problems, I am finding more advantages with using Lightroom than disadvantages. While I have to spend more time tweaking an image compared to CaptureNX, the other areas of the tool streamline my process so I can actually spend less time per image than I did previously. Additionally, only having one tool active for most of my processing means I'm using less memory and my PC runs much more smoothly. When and if Adobe fix the described problems, Lightroom is only going to get better.